
How To Use A Torque Wrench? An Ultimate Guide 2025
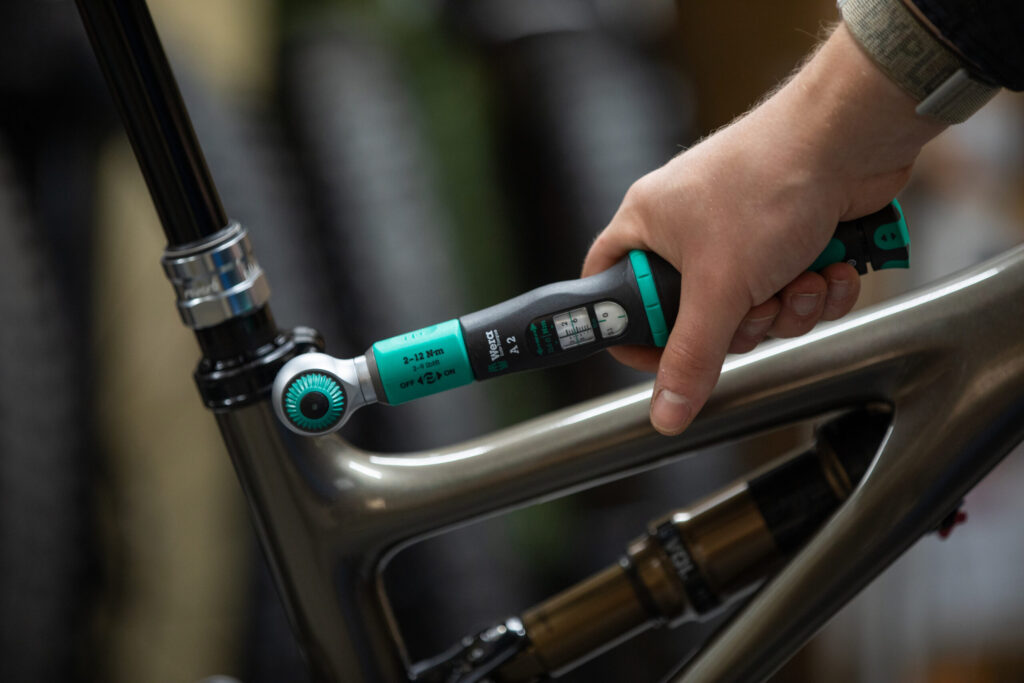
A torque wrench is a specialized tool that helps you tighten nuts and bolts with the right amount of force. Everything is tightened securely without being too tight, which may damage it. There are many torque wrenches, each having special uses, making them great tools to have in your arsenal.
Have you experienced trouble determining if a bolt or nut is properly tightened? It’s very common and can lead to problems like broken parts and unsound machines. With the proper application of a torque wrench, that can be avoided.

This complete guide will take you through each step of what you may need to know, from setting up to tightening fasteners the right way. Whether you are a new tool user or want to improve your skills in using a torque wrench, this article will help you use the torque wrench accurately. Read also Husky 56 Inch Tool Cabinet Review
Why Use a Torque Wrench?
When repairing an automobile or putting up machinery components, some fasteners require specific tightening values for safety and performance. Incorrect torque settings will mean loose fasteners or damaged threads. A torque wrench is designed so that you can be sure to apply only the correct torque, which will keep the fastener intact, safe, and secure.
How Does a Torque Wrench Work?
A torque wrench applies a set amount of rotational force or torque to a fastener. Torque measures in foot-pounds (lb·ft), inch-pounds (lb·in), or Newton meters (N·m). Most wrenches have scales for both foot-pounds and Newton meters. Foot-pounds are the more common unit of measure used in the US. For accuracy, refer to the proper Torque Wrench Settings Chart or manual for each application.
Setting the Torque
- Find the Torque Value: Go by your manual or get a chart to find out what torque is required for your fastener.
- Turn the Handle: Turn the locking knob at the base counterclockwise. Rotate the handle to the desired setting. Turn the knob clockwise to turn the locking nut in and lock the torque setting in place.
How to Set a Torque Wrench in Newton Meters
To set a torque wrench to 10 Newton meters (Nm), locate the Nm scale on the wrench. Then, turn the handle until it points at 10 Nm, and lock the setting in place. When you have conversions between Newton meters and foot-pounds, the following Torque Wrench Settings Chart is helpful.
- Always inspect the scale before you begin changing the torque.
- Locking the setting ensures that there is no drifting in the readings, making it important to achieve precision when using a wrench.
Types of Torque Wrenches
There are three main types of torque wrenches.
1. Click Torque Wrenches
The click torque wrench is the most popular of all kinds. It works on the principle of simple and effective design. It produces a specific “click” sound when the preset torque value is reached to signal that one must stop tightening. This eliminates overtightening and makes it highly reliable in every job assigned to it.
- Usage: Suitable for most jobs to be done inside tight spaces with precision as the key.
- Feature: Equipped with a ratcheting mechanism to tighten and loosen.
Read also Husky Tools vs Kobalt Tools
2. Digital Torque Wrenches
Digital torque wrenches are more accurate because the torque value will show up on an electronic screen. This is widely used for tasks because previous settings will be memorized, and it will alert the user when target torque is achieved with a beep or light.
- Usage: Suitable for high-accuracy projects, such as repairing an engine and aerospace.
- Feature: It has an audible beep or light indicator when the preset torque is reached to ensure precise results.
3. Beam Torque Wrenches
Beam torque wrenches are simpler, stronger, and more durable than other types of torque wrenches. Beam torque wrenches have no moving parts and do not wear out easily, so they are not so difficult to maintain. They are often very accurate and strong for most jobs.
- Usage: Very much used in do-it-yourself projects and car maintenance, where durability and simplicity are the most important things.
- Feature: They are constructed from simple designs with no moving parts that include wear and tear.
Use of Torque Wrench
A torque wrench is a very important tool that directly applies force to fasteners, such as nuts and bolts. It is important to use the torque wrench correctly in order not to damage parts with inaccurate levels. The steps for adjusting and using the torque wrench to tighten the fasteners are shown below:
Method 1: Adjusting the Wrench
Adjusting a torque wrench is crucial for applying the right amount of torque to fasteners, ensuring both safety and effectiveness in your projects.
Step 1: Loosen the Locking Knob
First, you will find the locking knob at the bottom of the wrench. This knob holds in your torque setting. To loosen it, you need to turn the knob counterclockwise. Slacken enough that the handle rotates freely. You do not need to remove them completely.
Step 2: Identify the Torque Measurements
Now, look for torque values marked on the shaft of the wrench. The value may be expressed in Newton meters (N·m) or foot-pounds (lb·ft). These mark the actual place above the handle of the wrench. Refer to your project requirement to determine which torque value needs to be utilized.
Step 3: Set the Approximate Torque
Grip the wrench with one hand, and turn the torque setting knob with the other. You can rotate the handle clockwise to add torque or counterclockwise to subtract torque. The zero hash mark is on the left side of the handle. Place the top of the handle at the hash mark from which you will make your setting.
Step 4: Make Precise Adjustments
Now you have the approximate torque set, it’s time to fine-tune your adjustment. Use the small dial at the top of the wrench handle to make very precise settings. To add smaller increments of torque, turn the dial clockwise. To decrease the torque, turn it counterclockwise. If you need 145 foot-pounds, then set the handle at 140 and use the dial for the final 5 foot-pounds.
Step 5: Secure the Locking Knob
Now, you must turn the locking knob clockwise until you have reached the desired torque value. This will allow the wrench to lock in place and remain steady with the torque value you selected for your task.
Method 2: Tightening Nuts and Bolts
Tightening nuts and bolts with a torque wrench would get fasteners tied up on the correct specs. This would possibly prevent any damage and ensure safety.
Step 1: Attach the Socket
Start by choosing the right socket that closely resembles the nut or bolt size you are dealing with. You use a little force to push the socket onto the head of the torque wrench until it clicks, meaning that a snug fit has been made. If otherwise, the nut or bolt is inaccessible, consider using a socket extender for ease.
Step 2: Hand-tighten the Fastener
The nut or bolt is also hand-tightened before the use of a torque wrench so the fastener will be correctly aligned, minimizing the possibility of cross-threading. Hand-tighten the fastener clockwise only until it is snug, but do not make it tighter with tools.
Step 3: Position the Wrench
Position the torque wrench over the nut or bolt after hand-tightening it. The socket must be fitted snugly to the nut so that it doesn’t slip out when the tightening is done. Hold the handle of the wrench using your light hand and guide the socket with the dominant hand to position everything perfectly.
Step 4: Tighten with the Wrench
Now, turn the handle clockwise to tighten the fastener. The torque wrench has a ratcheting mechanism. You return the handle to its initial position, and you do not lose any applied torque. It is more convenient to continue tightening without repositioning the wrench.
Step 5: Listen for the Click
Pay close attention when you apply the force. Once there is a clear “click,” you’ve met your preset torque, and the fastener is securely tightened. The moment you hear the click, stop immediately to prevent overtightening, which might even result in damage to the fastener and the wrench.
Read also Best Cheap Husky Tool Bags
Tips for Proper Use
- Stop at the Click: Don’t over-tighten once you hear the click because that can damage the fastener.
- Always use a ratchet first: When you are tightening a bolt, tighten it a little bit with a normal ratchet to just get it quite snug, and then finish off with a torque wrench for the final adjustment.
- Store Properly: Keep your torque wrench in its case, then reset it to its lowest setting after use.
Final Thoughts
Proper usage of a torque wrench ensures the safety and durability of your work. Whether you are tightening fasteners in a 1998 Ford Ranger or carrying out machinery maintenance, the correct torque value must be achieved.
For more detailed instructions, especially on specific torque measurements such as how to set the torque wrench to 10 Nm, refer to the manufacturer’s manual or a Torque Wrench Settings Chart. Always have a clean and calibrated wrench made with good storage conditions to provide maximum durability.
FAQs
What is the first step of using a torque wrench?
The first step is to loosen the locking knob on bottom of the wrench so you can set the torque.
What are the three rules of torque wrenches?
Always preset proper torque value, never back out fasteners with wrench, and store at lowest torque setting.
How would a torque wrench be used?
A torque wrench is a tool used to tighten nuts and bolts to a specific value of torque. That way, nuts and bolts will not be tightened too much or remain loose.
What is a basic rule to follow when using a torque wrench?
Stop tightening once you feel it click so that it won’t exceed the preset torque value.
What is the 20 rule for torque wrenches?
The “20 rule” caution states that torque wrenches must be used at least at 20% of its full scale to be truly accurate.


Way cool, some valid points! I appreciate you making this article available, the rest of the site is also high quality. Have a fun.
Thank you so much, I will be looking to improve and switch up some stuff hoping to bring even more value you and realness!
It’s really a cool and helpful piece of info. I’m glad that you just shared this helpful info with us. Please stay us informed like this. Thank you for sharing.